 Project 2: Tigers Conservation App - Spring 2026
Due: Tuesday March 24, before 9:00 pm
Objectives
- Implementing a balanced binary search tree (BST) data structure.
- Practice writing rebalancing routines for an AVL tree.
- Practice writing re-structuring routines for a Splay tree.
- Practice use of recursion in programs.
- Practice writing unit tests.
- Practice working in a Linux environment.
- Practice analyzing and understanding a project requirements.
Introduction
Asian tiger is considered an endangered species. The native countries of this species such as India and Nepal are executing conservation projects in order to save the species. Recently Nepal government announced that they were able to increase the population of tigers by 200% in 10 years. With the success Nepal government is facing a new problem; with the increasing number of tigers the human-tiger encounters are increasing which puts both humans and tigers in danger.
_female_3_crop.jpg)
A startup company decided to create an app that can be installed on a mobile device and alerts the user and authorities once a tiger is in the close proximity of the user. The locations are reported by a series of sensors installed across the conservation area.
You are assigned a task to implement the data structure module of the app. This data structure is a combination of self-balancing binary search trees.
Binary Search Tree (BST)
A binary tree is a tree structure in which each node has either 0, 1, or 2 children. A BST is a derivative of a binary tree where each node contains a key and value pair. The key determines the nodes' placement in the tree, and the value is the data to be stored. Given a set of rules about how to order the keys, we can create a structure where we can query data from it with a specified key. For a BST, we define these rules as follows:
- If the target key is less than the key at the current node, traverse to the left child.
- If the target key is greater than the key at the current node, traverse to the right child.
- If the keys are equal, the action is determined by our application of the tree. More on this later.
A BST on its own can be efficient, but as the dataset increases in size, we can start running into problems. In the worst case, our BST can become a linked list where each of the new keys is greater than or less than the previous one inserted. On the contrary, the best case is inserting elements into the tree in a way to make it a complete tree. Either case is rare to occur with a large dataset, but imbalances are common. An imbalance can be defined when one subtree on a node becomes significantly larger in size or height compared to the other subtree. As the tree becomes increasingly imbalanced, our average query times begin to increase. Luckily, we have methods to prevent large imbalances.
The AVL Tree
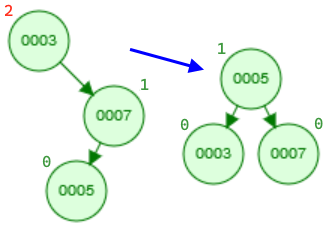
An AVL tree employs rotations during insertions or deletions to balance a BST. As the name implies, nodes are literally rotated up the tree to keep its structure complete. A complete tree, or ideally a perfect tree, is the most efficient kind of binary tree. Insertions, deletions, and queries all take O(log(n)) time in such a case. AVL trees have two types of rotations, left and right, which are shown in the diagram below:
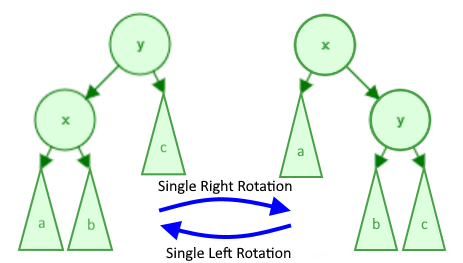
The variables "x" and "y" refer to 2 specific nodes whereas the subtrees "a", "b", and "c" refer to subtrees (which is just a pointer to a node which may or may not have more children). Note that the pointers to "a", "b", and/or "c" can be null, but "x" nor "y" will never be null.
The key to keeping an AVL tree efficient is when we perform these rotations. A rotation is performed on a node that is imbalanced, and an imbalance occurs when the node's children's heights differ by more than 1. For example, in the above diagram, consider node "y" to be imbalanced in the right rotation and node "x" to be imbalanced in the left rotation. Using a left and right rotation, we can perform four rotation combinations. The imbalance in the following examples occurs on the node with the height of 2 (in red).
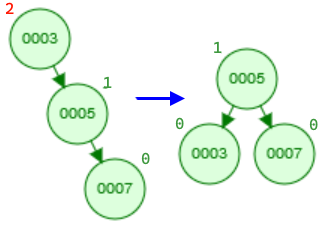
- Single left rotation: This is a simple case where we can apply a left rotation to the top node to balance the tree.
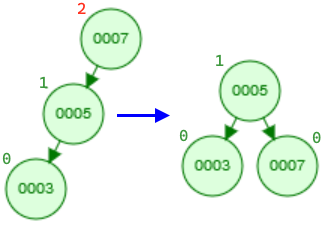
- Single right rotation: Similar to the above case, we can apply a single right rotation to the top node to balance the tree.
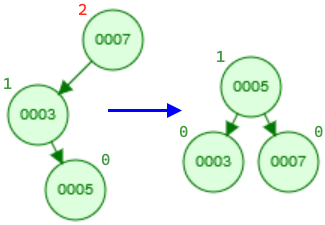
- Double left-right rotation: The following two cases become more complicated and require two rotations. In this example, the imbalance still occurs at the node with height 2. If we perform a single right rotation, we still end up with an unbalanced tree, just mirrored (draw a diagram). So, we must perform two rotations. The first left rotation should transform the tree into a form we can balance with a second right rotation. Which node should the first rotation be performed on (hint: it's not necessarily the node with height 2)?
- Double right-left rotation: Likewise, this case uses a right rotation followed by a left rotation.
The Splay Tree
Splay trees are binary search trees in which we store the recently accessed node at the root of tree. Such a tree would be a good choice for data structure, if in the application some data points are accessed more frequently than others. Although some work is required in this data structure to bring up the recently accessed data point to the root, but as soon as a node is at the root, the next time its access time is O(1). The amortized analysis of Splay trees reveals that the search operation is O(log n).
Assignment
Your assignment is to implement a data structure combining multiple binary search trees with balancing and restructuring methods.
For this project, you are provided with the skeleton .h and .cpp files and a sample driver:
- streak.h – Interface for the Grid, Tiger and Streak classes.
- streak.cpp – A skeleton for the implementation of the Grid and Streak classes.
- driver.cpp – a sample driver program. (Note: this file is provided to show a typical usage. Since the project is not implemented, trying to compile and run this driver program will not generate the sample output in driver.txt. Once you develop your project, you should be able to generate the same output as driver.txt by running this driver program.)
- driver.txt – a sample output produced by driver.cpp
Please note, you may not change any of the private variables or public function declarations or file names. They will be used for grading. Also, any provided function implementations may not be modified. You may, however, add your own private functions as helpers. The current private function declarations are provided as a backbone to help you.
Additionally, you are responsible for thoroughly testing your program. Your test program, mytest.cpp, must be submitted along with other files. For grading purposes, your implementation will be tested on input data of varying sizes, including very large data. Your submission will also be checked for memory leaks and memory errors.
Specifications
Class Streak
The Streak class implements an AVL BST. The Streak::m_root member variable points to a node of type Tiger. Every node in Streak is a Tiger object. The nodes are organized as a binary search tree. The Streak class supports the insertion and deletion operations. After insertion or deletion operations the class checks for any imbalance and if required it performs the rebalancing operations.
For the Streak class, you must implement the following methods in streak.cpp:
Note:
- In the Streak tree data structure every node is a Tiger object which is represented as a pointer to the Tiger object. Therefore, for every insertion we need to allocate memory and use the information of tiger to initialize the new node. Memory allocation takes place in the Streak class.
- After an insertion, we should also update the height of each node on the path traversed down the tree as well as check for an imbalance at each node in this path.
(Hint: if you want to implement the functionality recursively, to facilitate a recursive implementation you can introduce a helper function.)
(Note: After a removal, we should also update the height of each node on the path traversed down the tree as well as check for an imbalance at each node in this path.)
Class Grid
The class Grid constructs a Splay tree in which the nodes are Streak. The key of a node is the m_gridID which is a unique ID. If a node is accessed the splay operation happens otherwise there is no splay. The following table describes the public interface of the class.
Note: The implementation for this function is provided. You do not need to modify it.
Additional Requirements
- The class declarations and provided function implementations in streak.cpp may not be modified in any way. No additional libraries may be used. However, private helper functions are permitted in the Grid and Streak classes.
- No STL containers or additional libraries may be used in the implementation of the project classes. However, you can use STL containers in the Tester class for the testing purposes.
- The required functionality is provided in the Tiger class. There is no need for any modifications to the implementation of this class.
- Your code should not have any memory leaks or memory errors.
- In the AVL tree the lowest level of nodes which store the keys have zero height.
- Your test program must use the Random class.
- Follow all coding standards as described on the C++ Coding Standards. In particular, indentations and meaningful comments are important.
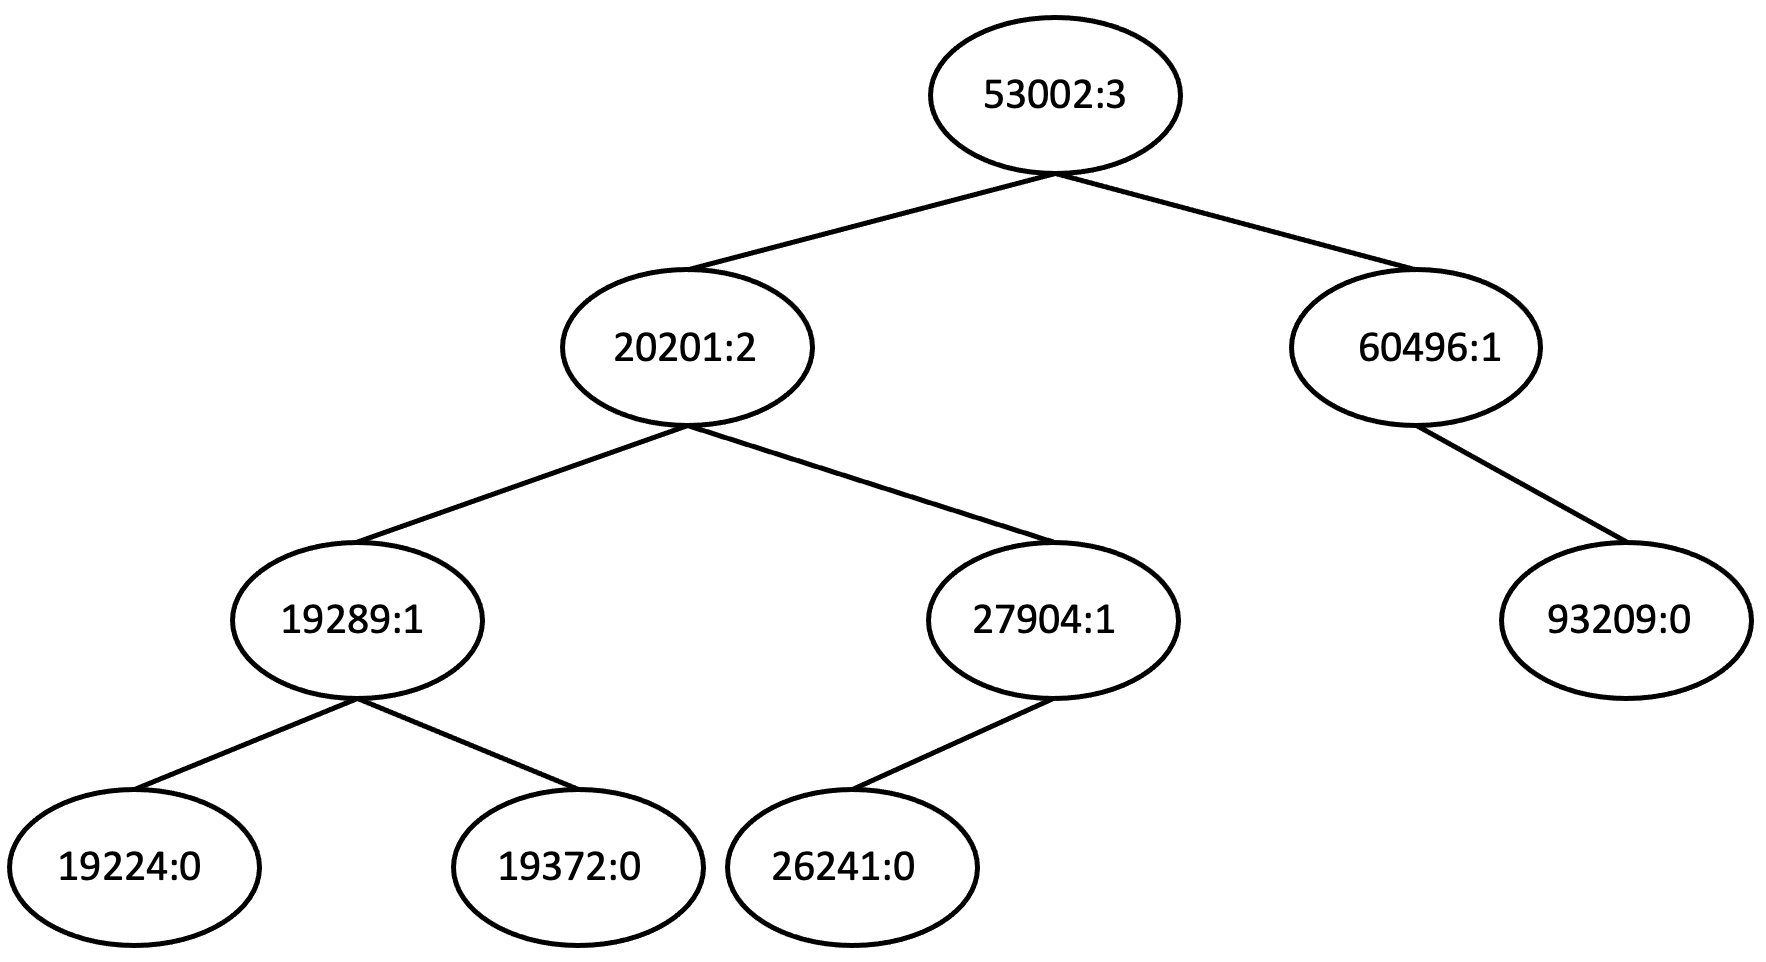
- The function Streak::dumpTree(...) prints out the tiger ID followed by a : followed by the height of the node. Furthermore, Streak::dumpTree(...) prints an open bracket before visiting the left subtree and a close bracket after visiting the right subtree. The following shows an example of such an output.
The tree viewer tool shows a graphical representation of the output of the dump function. You can copy & paste the dump output in the viewer. This tool facilitates debugging.
Note: The implementation for this requirement is already provided.
((((19224:0)19289:1(19372:0))20201:2((26241:0)27904:1))53002:3(60496:1(93209:0)))
- The function Grid::dump(...) prints out the nodes information in an in-order traversal. For every node, it prints the node's key by default. If true value is passed to the function as a parameter, the function prints the ID of the node's root node too (Note: every node in Grid is a tree itself).
The tree viewer tool shows a graphical representation of the output of the dump function. You can copy & paste the dump output in the viewer. This tool facilitates debugging.
Note: The implementation of the dump function is provided to you.
(((((((42289:63604)54496:69798)57887:45461)61962:62568)62018:67406)66563:61757)71708:78661(80112:61855(83821:60558(92329:89537))))
Testing
You need to test your project and you need to submit your tests along with your project. Tests must be submitted in a file called mytest.cpp.
- The test file name must be mytest.cpp; the file name must be in lower case, a file name like myTest.cpp is not acceptable.
- The test file must contain the declaration and implementation of your Tester class and the main() function as well as all your test cases, i.e. calls to your test functions.
- You are responsible for thoroughly testing your work before submission. The following section presents a non-exhaustive list of tests to perform on your implementation.
- You must write a separate function for every test case.
- Every test function must return true/false depending on passing or failing the test. Visual outputs are not accepted as test results.
- Tests cannot be interactive. The test file mytest.cpp must compile and run to completion.
- An example of declaring, implementing, and calling a test function, and outputting the test results was provided in the driver.cpp file of project 0.
- The testing guidelines page provides information that helps you to write more effective test cases.
Note: Testing incrementally makes finding bugs easier. Once you finish a function and it is testable, make sure it is working correctly.
Testing Project Classes
- Test whether the AVL trees are balanced after a decent number of insertions, e.g. inserting the provided database. (Note: this requires visiting all nodes and checking the height values are correct.)
- Test whether the BST property of the AVL trees is preserved after all insertions.
- Test whether the Splay tree performs the splay operations when inserting. For example, we can insert multiple nodes in the splay tree and after every insertion we check whether the inserted node is at root and the tree preserves the BST property.
- Test whether the AVL trees are balanced after multiple removals. For example, insert database, then remove half of the tigers, and check the AVL property.
- Test whether the BST property is preserved after multiple removals from the AVL trees.
- Test whether the function Streak::remove(...) works correctly for multiple tiger removals, e.g. 50 removals.
- Test whether the function Streak::findTiger(...) works correctly for multiple tiger searches, e.g. 50 searches.
- Test whether the function Grid::count(...) returns a correct value for a specific state, i.e. it returns a correct value and it performs the splay operation.
- Test whether the function Grid::setState(...) works correctly, i.e. it returns a correct value and it performs the splay operation.
- Test whether the BST property is preserved in the Splay tree after multiple Splay operations.
Random Numbers for Testing
For testing purposes, we need data. Data can be written as fixed values or can be generated randomly. Writing fixed data values might be a tedious work since we need a large amount of data points. You must use the provided Random class to generate test data.
In the file driver.cpp there is the class Random which generates pseudorandom numbers. The class is using a default seed value. On the same machine it always generates the same sequence of numbers. That is why the numbers are called pseudorandom numbers, they are not real random numbers. Please note, the numbers are machine dependent, therefore, the numbers you see in the sample file driver.txt might be different from the numbers your machine generates.
Memory leaks and errors
- Run your test program in valgrind; check that there are no memory leaks or errors.
Note: If valgrind finds memory errors, compile your code with the -g option to enable debugging support and then re-run valgrind with the -s and --track-origins=yes options. valgrind will show you the lines numbers where the errors are detected and can usually tell you which line is causing the error. - Never ignore warnings. They are a major source of errors in a program.
What to Submit
You must submit the following files to the proj2 directory.
- streak.h
- streak.cpp
- mytest.cpp - (Note: This file contains the declaration and implementation of your Tester class as well as all your test cases and a main function.)
If you followed the instructions in the Project Submission page to set up your directories, you can submit your code using the following command:
cp streak.h streak.cpp mytest.cpp ~/cs341proj/proj2/
Grading Rubric
For details of grading rubric please refer to Project Grading Policy