 Project 0: Digital Painting - Spring 2026
Due: Tuesday Feb 10, before 9:00 pm
Objectives
- Review the procedures to access the GL servers and to compile programs on GL.
- Review C++ memory management (allocating and deallocating memory dynamically).
- Use Valgrind to check for memory leaks.
- To practice writing unit tests.
- To practice working in a Linux environment.
- To practice analyzing and understanding a project requirements.
Introduction
In this project, you will complete a C++ class by writing a copy constructor, destructor, and assignment operator. Furthermore, you will write a tester class and a test program and use Valgrind to check that your program is free of memory leaks. Finally, you will submit your project files on GL. If you have submitted programs on GL using shared directories (instead of the submit command), then the submission steps should be familiar.
In this project we develop an application which holds the information about a digital art piece. There are two classes in this project.
The Random class generates data. The implementation of this class is provided. It generates random int numbers for colors. To create an object of this class we need to specify min and max values for the constructor. The colors fall between 10 and 99 inclusively.
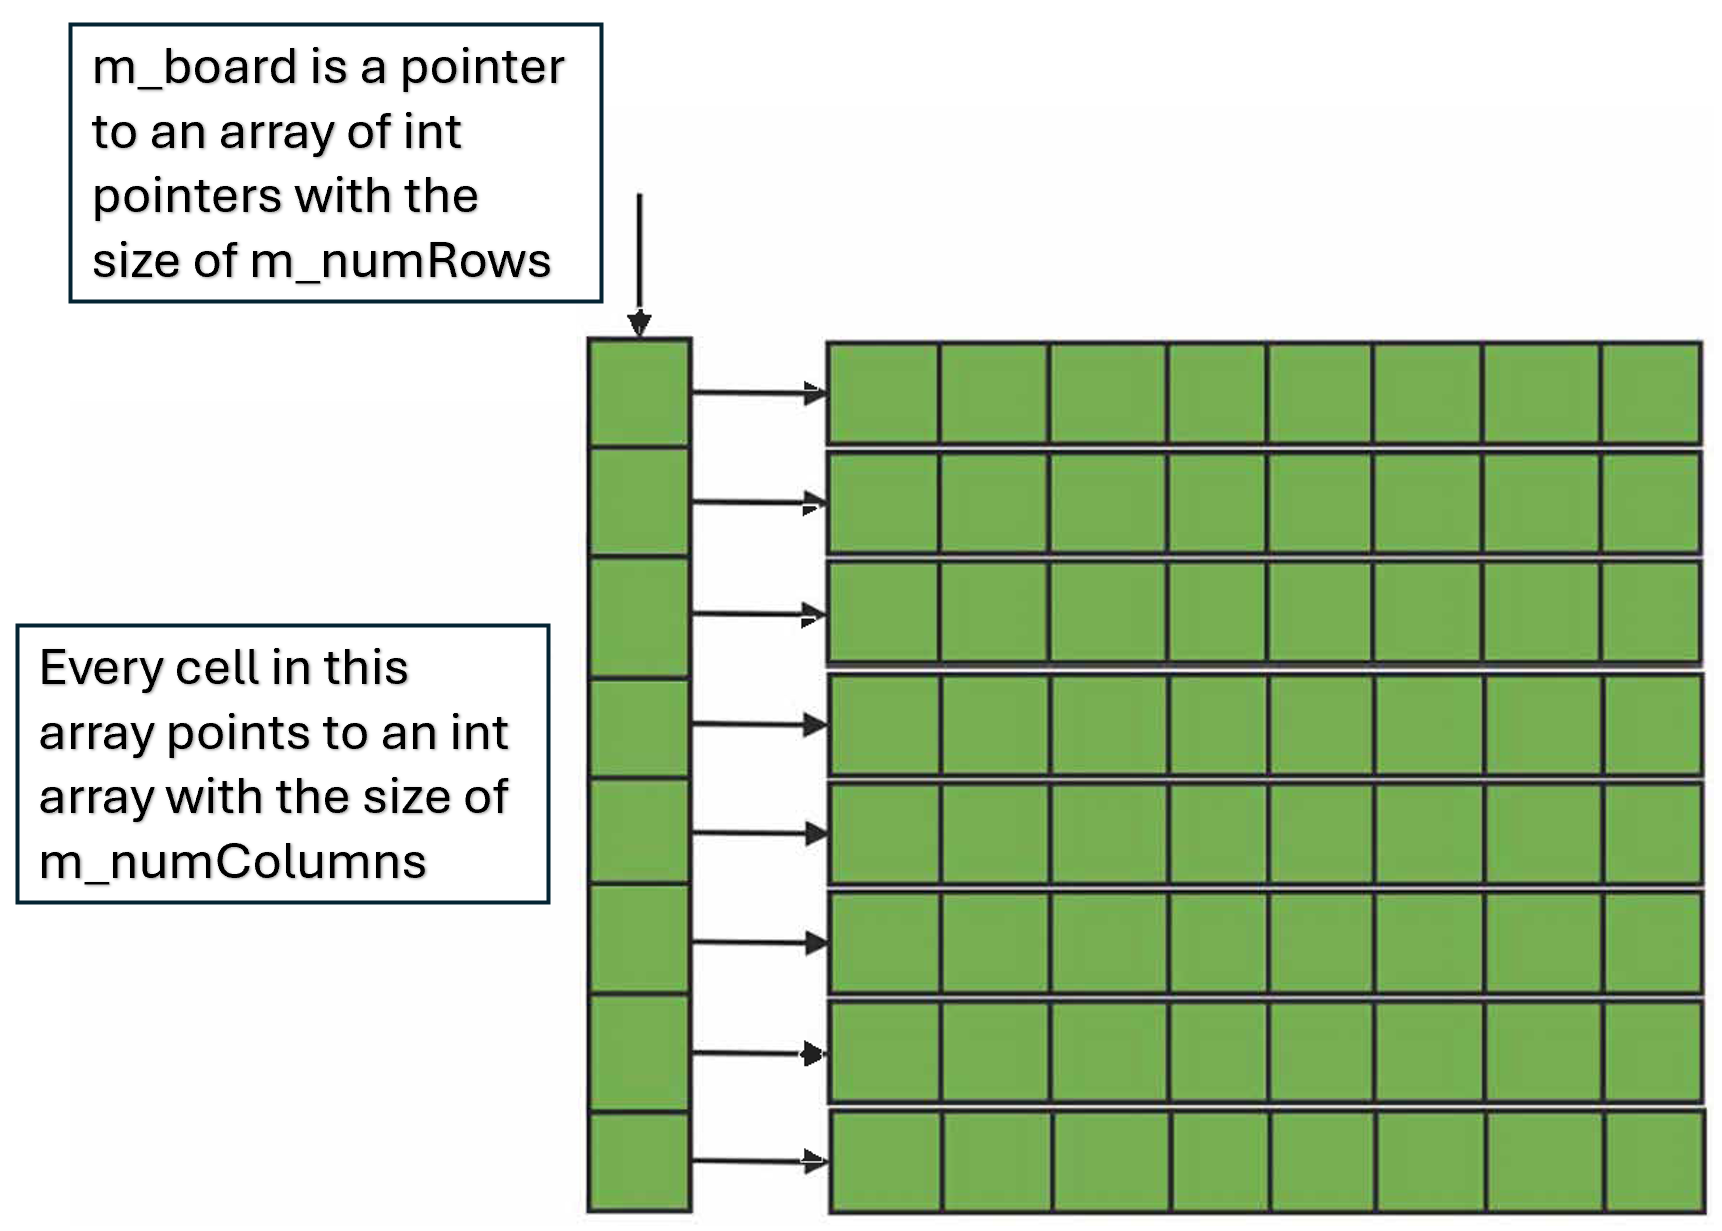
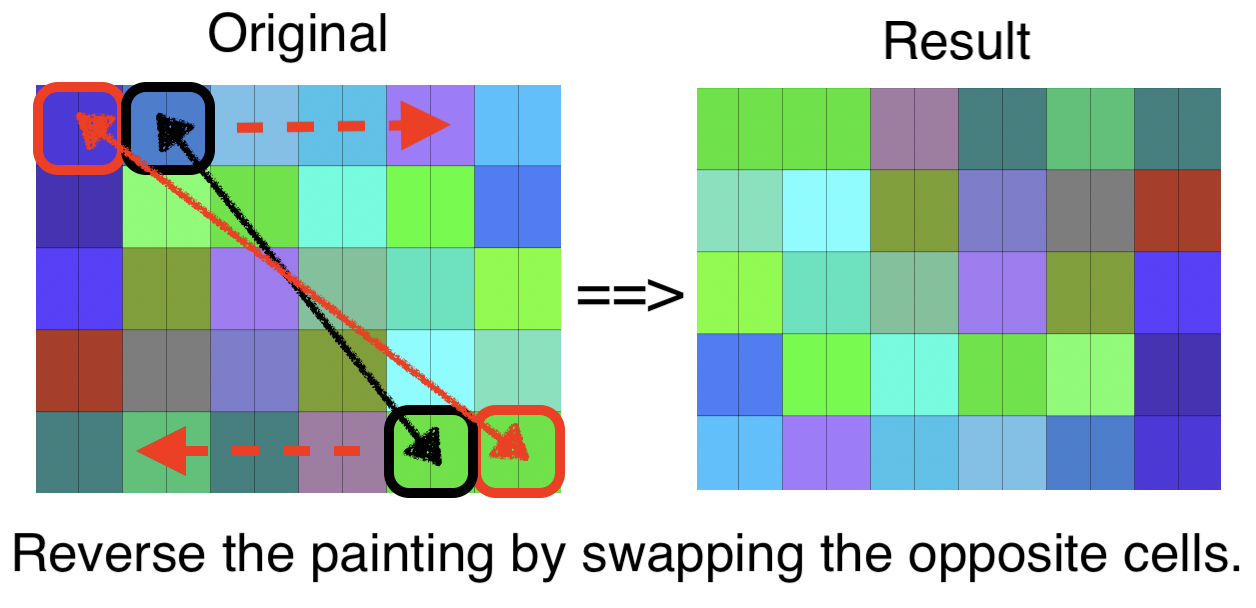
The Art class generates random colors and stores the color values. You implement the Art class. An object of the Art class is a digital masterpiece. The class stores the color values for every part of the masterpiece in a cell of a 2D array. The following figure presents multiple examples of a masterpiece presentation.

The following figure represents the main data structure in this project. It is a 2d structure.
Assignment
Step 1: Create your working directory
Create a directory in your GL account to contain your project files. For example, cs341/proj0.
Step 2: Copy the project files
You can right-click on the file links on this page and save-as in your computer. Then, transfer the files to your GL account using SFTP.
For this project, you are provided with the skeleton .h and .cpp files, a sample driver, and the output of driver program:
- art.h - The interface for all Random and Art classes.
- art.cpp - The skeleton for the Art class implementation.
- driver.cpp - The sample driver/test program.
- driver.pdf - The output of sample driver/test program.
Step 3: Complete the Art class
You need to implement the class according to the requirements. For the requirements please refer to the Specifications, The Rules, and Additional Requirements sections on this page.
Step 4: Test your code
You need to test your implementation properly and adequately. For a description of testing please refer to the Testing section on this page. Moreover, a sample test function has been provided in the file driver.cpp for your reference.
Step 5: Check for memory leaks
Run your test program using Valgrind. For example, assuming you have compiled mytest.cpp, producing the executable mytest.out, run the command
valgrind mytest.out
If there are no memory leaks, the end of the output should be similar to the following:
   ==8613==
            ==8613== HEAP SUMMARY:
            ==8613==     in use at exit: 0 bytes in 0 blocks
            ==8613==   total heap usage: 14 allocs, 14 frees, 73,888 bytes allocated
            ==8613==
            ==8613== All heap blocks were freed -- no leaks are possible
            ==8613==
            ==8613== For lists of detected and suppressed errors, rerun with: -s
            ==8613== ERROR SUMMARY: 0 errors from 0 contexts (suppressed: 0 from 0)
The important parts are “in use at exit: 0 bytes” and “no leaks are possible.” The last line is also important as memory errors can lead to leaks.
Step 6: Link your shared directory
Please take this step as soon as you receive the notification indicating the shared submission folders are ready.
Leaving this step to the last minute can prevent you from submitting your work on time.
Please note:
* No other method of submission will be accepted due to such a problem.
* No late submission will be accepted due to such a problem.
Follow the instructions on the Project Submission page to make a symbolic link to the shared directory in your home directory.
Step 7: Submit your files
See the “What to Submit” section, below.
Specifications
You must implement the following functions. These functions are the public interface of the project. The public interface will be used to test your project. You can use private helper functions in your design of this project. They won't be called directly for testing.

Additional Requirements
- The class declaration (Art) in art.cpp may not be modified in any way. No additional libraries may be used.
- You must use nullptr to set pointers to a default value. Do not use NULL or zero or any other value for this purpose.
- You must use the Random class to generate test data.
- You are not allowed to use STL template containers in your project implementation.
- You are allowed to use STL template containers in your test functions.
- The class functions must be written in art.cpp; in particular, they must not be written “in-line.”
- Private helper functions may be added, but must be declared in the private section of the Art class. There is a comment indicating where private helper function declarations should be written.
- You should read through the coding standards for this course.
Testing
Important, points will be deducted for violating the following list:
- The sample driver.cpp file will not be accepted as a test file.
- The name of the test file must be mytest.cpp.
- The mytest.cpp file contains the Tester class, and the main function.
- The test cases must be implemented in the Tester class, and must be called in the main function.
- Every test function returns true or false to indicate the pass or fail.
- A dump() function is provided for debugging purposes, visual inspections will not be accepted as test cases.
You must write and submit a test program along with the implementation of your project. To test your project class, you implement your test functions in the Tester class. The Tester class resides in your test file. You name your test file mytest.cpp. It is strongly recommended that you read the testing guidelines before writing test cases. A sample test program including Tester class, and sample test functions are provided in driver.cpp. You add your Tester class, test functions and test cases to mytest.cpp. You must write a separate function for every test case.
Any program should be adequately tested. Adequate testing includes test functions for normal cases, edge cases and error cases if any applies. The following list presents some examples for this project:
- Trying to create an Art object with -1 height or -10 width is an error case.
- Trying to create an Art object with 1 height and 1 width is an edge case.
- Trying to create an Art object with 10 height and 10 width is a normal case.
The following presents a non-exhaustive list of tests for this project. Please note, you need to test your work adequately.
- Test whether the constructor works correctly for an error case, e.g. it creates an empty object if the user tries to create an object with -5 height and -10 width.
- Test whether the copy constructor works correctly for a normal case. Here is a sample algorithm:
- Create a normal object,
- Create a copy of previous object using the copy constructor,
- Check whether m_painting of original object and copy object point to different memory locations,
- Check whether the corresponding member variables of both objects carry the same values,
- Check whether all corresponding color codes are equal in both objects.
- Test whether the copy constructor works correctly for an edge case, i.e. it copies an empty object correctly.
- Test whether the assignment operator works correctly for a normal case.
- Test whether the assignment operator works correctly for an edge case, i.e. it assigns an empty object correctly.
- Test whether left2Right(...) is working correctly for a normal case, i.e. appending two normal objects.
- Test whether left2Right(...) is working correctly for an error case, i.e. two objects have different heights.
- Test whether left2Right(...) is working correctly for appending a normal object to an empty object.
- Test whether left2Right(...) is working correctly for appending an empty object to a normal object.
- Test whether left2Right(...) is working correctly for appending an object to itself.
The following test function is provided to you in driver.cpp in the Tester class as a sample test function. We recommend that you study the implementation of this function.
What to Submit
You must submit the following files to the proj0 submit directory:
- art.h
- art.cpp
- mytest.cpp (Note: This file contains the declaration and implementation of your Tester class as well as all your test cases.)
If you followed the instructions in the Project Submission page to set up your directories, you can submit your code using the following command:
cp art.h art.cpp mytest.cpp ~/cs341proj/proj0/
Grading Rubric
For details of grading rubric please refer to Project Grading Policy